


🌍 Be the Weather Whisperer!
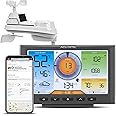
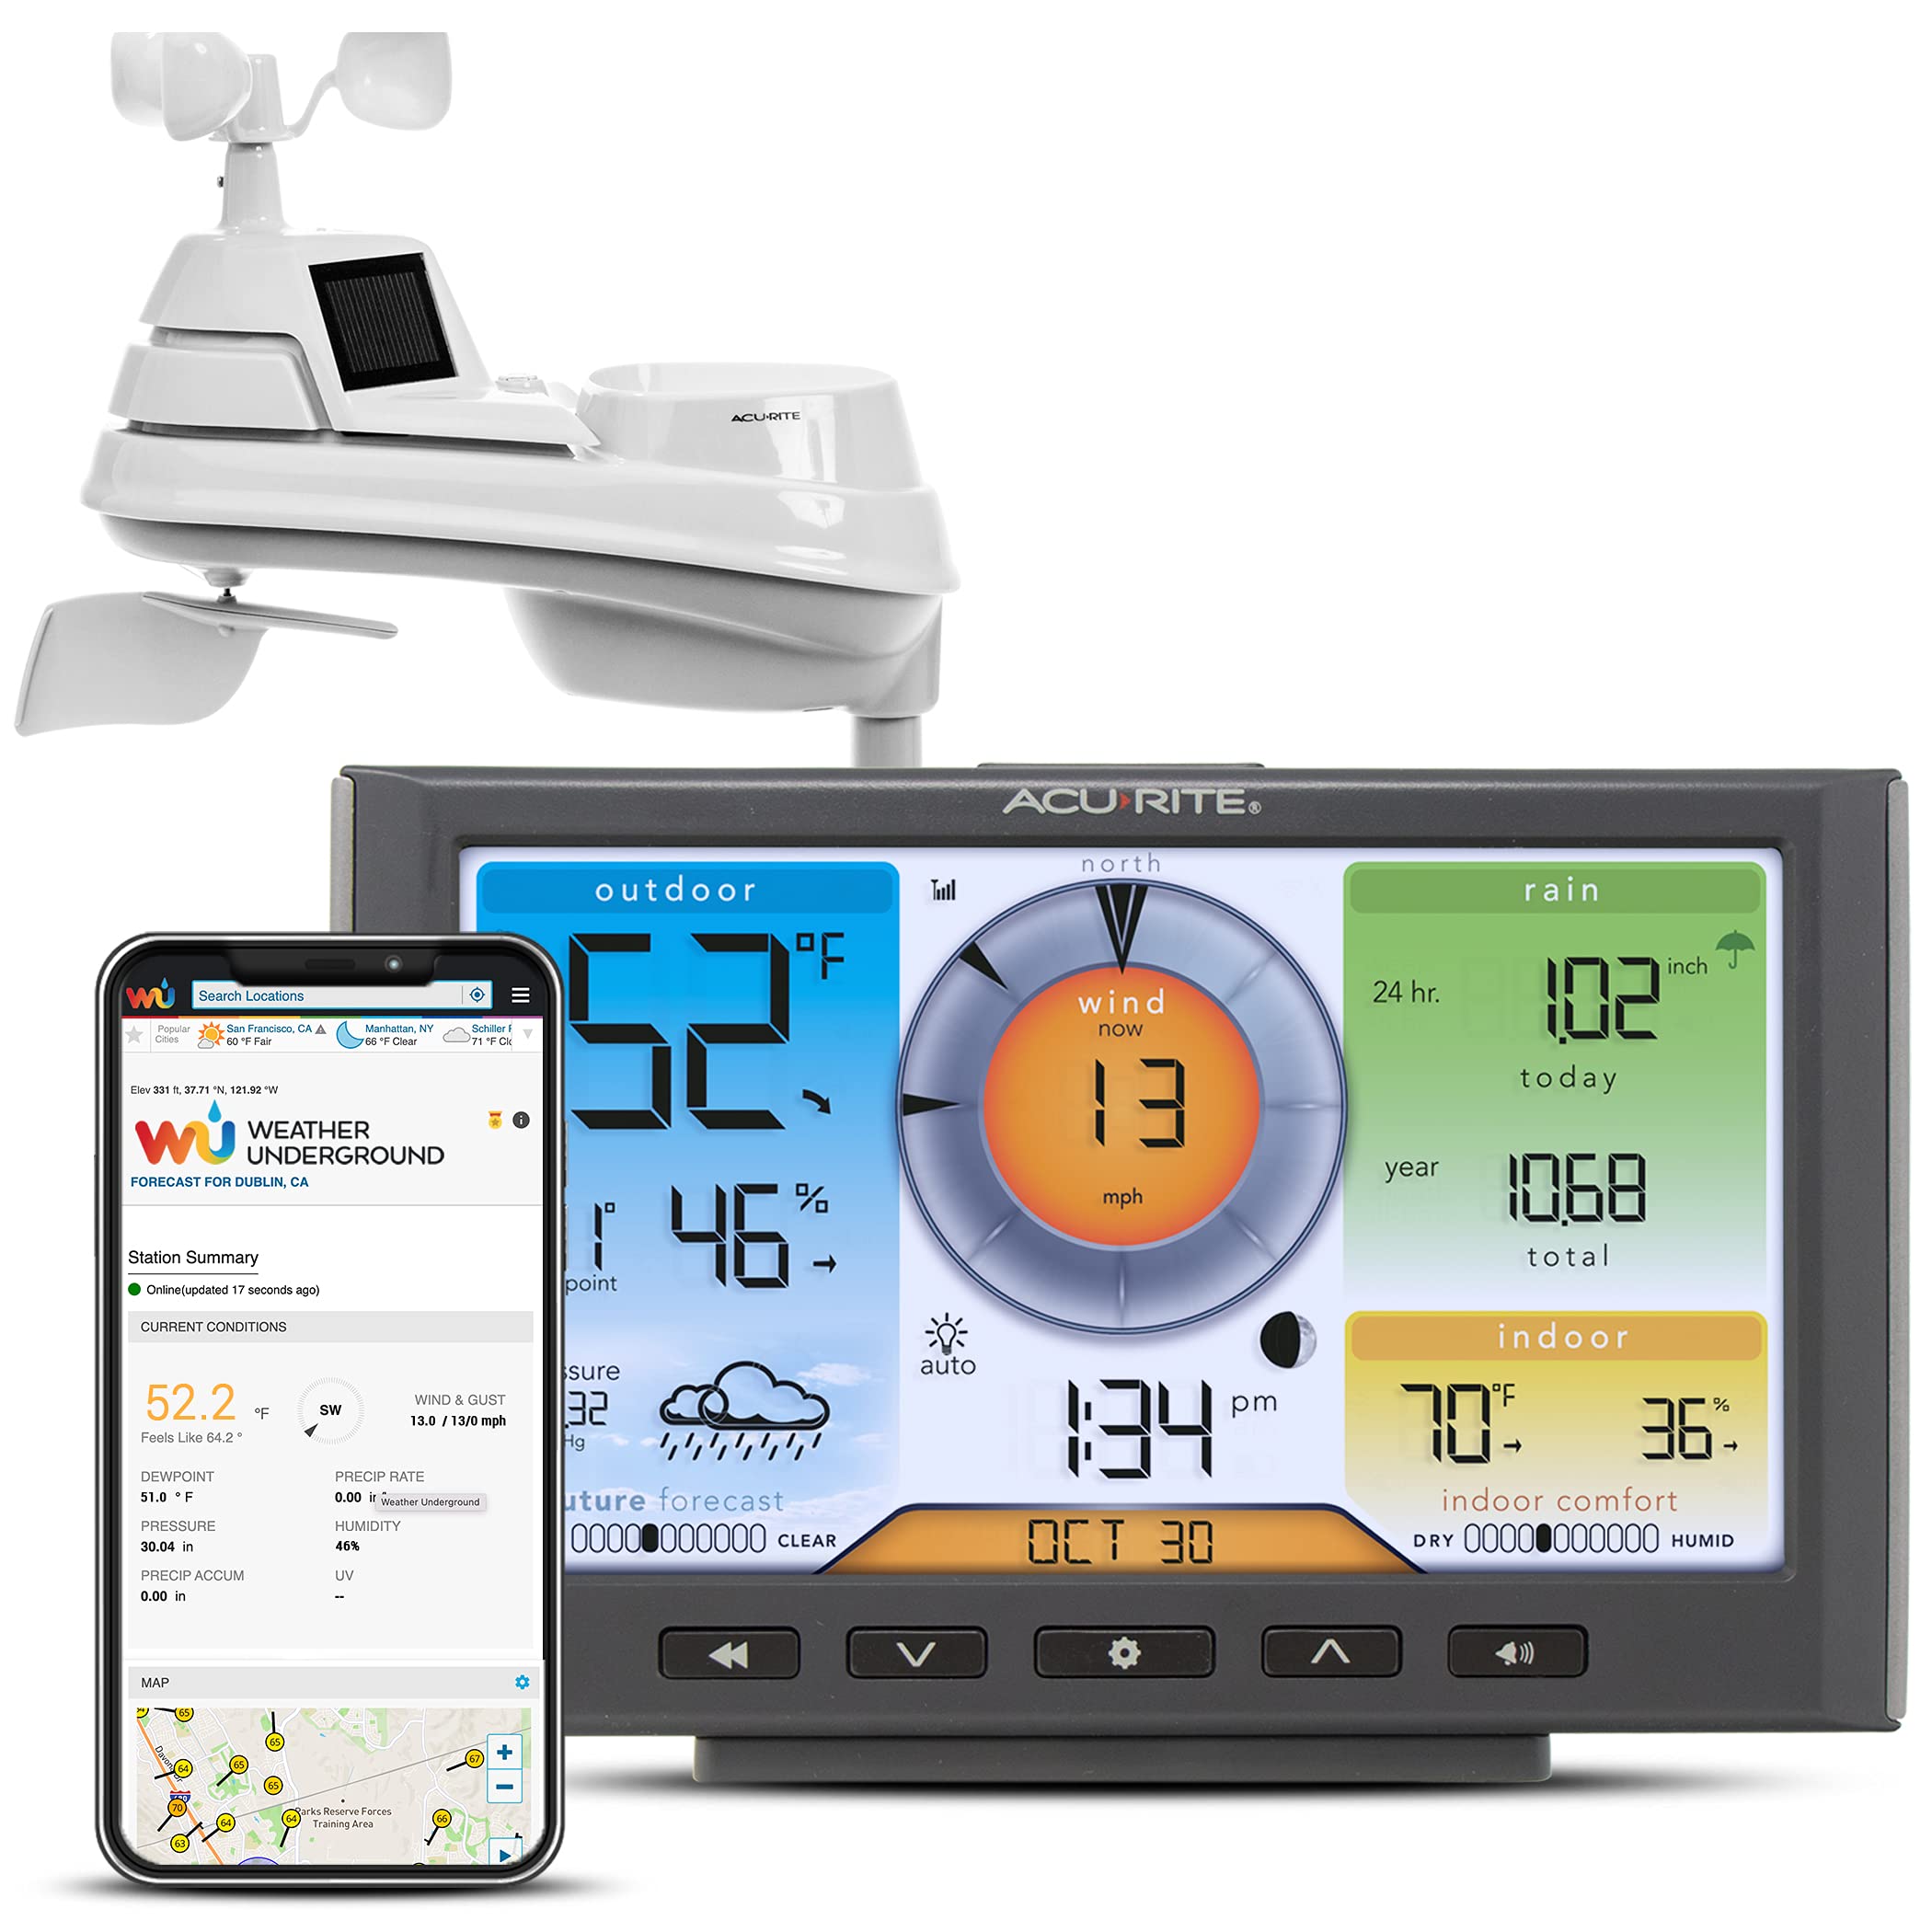
The AcuRite Iris (5-in-1) Home Weather Station is a cutting-edge device that wirelessly monitors indoor and outdoor weather conditions, providing real-time data on temperature, humidity, wind speed/direction, and rainfall. With a large LCD display and Wi-Fi connectivity to Weather Underground, it offers comprehensive insights and easy sharing of weather data. Ideal for anyone looking to stay informed and connected to their local climate.


| Sensor Technology | Wireless |
| Are batteries included? | No |
| Display Type | LCD |
| Temperature Accuracy | +/- 2 degrees_fahrenheit |
| Power Source | Battery Powered |
| Additional Features | Wireless, Pre-Calibrated, Adjustable Brightness, Weather Resistant, Clock |
D**N
Very accurate and easy to read once you get through the instructions
I bought it on May 20th 2025 and installed the sensor and set up the account through weather underground 🚇. I found the sensor to be accurate within 2 degrees of temperature and 1/10th of an inch for rain fall measurements compared to weather channel and local weather and news channels.I found during the setting up was A LOT EASIER using my laptop and then signing in through the phone app using the user name and password that I set it up with the laptop.It does take a couple of weeks for the sensor to properly calibate for weather predictions. Also found instructions confusing at first so I opened my laptop and then went step by step as I was setting it up and found it NOT as confusing as I went along.Last thing I found in the instructions that was contradicting, was where to place sensor outside.On one page, it states that it needs to be in the sun so the solar panels capture the sun throughout the day.Then on another page, it states the sensor needs to be in the shade to get the most accurate temperature reading.Confusing right??!!!!?!???I installed the sensor in full view of the sun making sure the sensor pointed north per the instructions and solar panels getting all the sun it could handle (BTW I live in south Florida) and so far the temperature sensor has been reading within a couple degrees of actual temperature.Other than the confusing instructions, I'm actually glad I got the acurite weather system.
H**Y
Well made and works as it should
I had an older station that started acting up so I went ahead and bought this one. It works great. Turns out the outside unit on the old station was the problem. The good news is that the old display was fine so I now have two displays in different parts of the house. I actually like the old display better, but the new one connects to WIFI for sending data.
A**H
Very satisfied so far... although set up to the wifi can be a PAIN!!! (instructions below)
Display has all the good information needed. Scrolling thru the history is simple also. The multi-lighted screen is a nice option. Keeping the temperature is good (but we needed to calibrate it!) What is a pain is getting it all setup. It is not PLUG IN PLAY! I had to adjust the temperature to be accurate (which can be tricky if you do not have something with the correct) . Waiting for it to rain to see how it tracks. Also, if the rain gauge is bumped, it may not register rain correctly. I suggest getting it all set up in its spot before adjusting any settings. Unfortunately, I have had to do a "reset" (button by batteries) many times going through the setup process and troubleshooting things. Wish I could just reset the daily rain totals and not the whole thing. I believe you can reset the week/ month/ yearly total but not the daily. LOLTO ADJUST TEMPERATURE- Hold the arrow up/ down and gear icon at the same time. Hold for about 8-10 seconds and release.- Only the temperature will show.- Use the up/ down arrows to adjust accordingly.- Push the gear to go to the next temp or precipitation that you want to adjust.- Once done leave it alone and it will go back to standard display screenTO CONNECT YOUR DISPLAY TO YOUR WI-FI:-From a smartphone (recommended), tablet, or Wi-Fi-enabled computer, open an internet browser and type 192.168.4.1 in the URL - DO NOT PRESS ENTERNOTE: Please make sure that you are near your AcuRite display unit for the strongest connection during the following steps.-Open the network tab and click on the AcuRite Wi-Fi Display Model Number.NOTE: The network tab is located in the bottom right corner of your computer screen on the taskbar, as shown below. If using a smartphone or tablet, you will need to access the Wi-Fi settings to view the list of available Wi-Fi networks.NOTE: If you do not see the display model under your network tab, please reset the display by pressing and holding the RESET button for 10 seconds, located in the battery compartment of the display. The date and time will need to be entered after a reset.-Press the connect button for the network that includes the Display Model Number.NOTE: This will disconnect your computer/device from your internet and the display's network may also say No Internet, as shown below.-After 20 seconds, go back to that prepared browser that has 192.168.4.1 typed in the URL and press enter.-Once the AcuRite Wi-Fi display settings website (splash page) is open, select your Wi-Fi network's SSID from the dropdown (if you have a 2.4 GHz and a 5 GHz, be sure to select the 2.4 GHz), enter your Password, Station ID, and Station Key, then click save.NOTE: If you are unable to open the AcuRite Wi-Fi display settings website after connecting to the display, disconnect from the display under the network tab, open a different internet browser, enter The IP address 192.168.4.1 into the URL but DO NOT PRESS ENTER. Connect to the display under the network tab and wait 20 seconds before clicking enter on the internet browser with the IP address entered.NOTE: If you receive an error stating that "This site can't be reached", please make sure that you are still connected to the AcuRite network and not your home Wi-Fi network. If your device automatically reconnected to your home Wi-Fi network before you were able to reach the AcuRite Wi-Fi display settings website, please have your device forget your home Wi-Fi network so that it will stay connected to the AcuRite network.-Your Wi-Fi Display unit is now connected to your Wi-Fi network!-First, reconnect your device back to your home Wi-Fi network if you are still connected to the display's Wi-Fi. Often times your device will automatically reconnect to your home Wi-Fi after completing the setup. Your station should come online on Weather Underground within a few minutes. (We recommend allowing at least 20 minutes for the station to show as online if it doesn't show up right away.)ACURITE IRIS® (5-IN-1) TEMPERATURE READING TOO HIGH (CHECK THE FAN IS WORKING)-Remove the four outer screws on the bottom of the sensor. Keep the screws for re-assembly. Note: Be careful not to remove or adjust the rain calibration screws located beneath the rain gauge.-Separate the upper and lower halves of the sensor.-Check the fan for debris, such as insects or spider webs. A gentle puff of air can clear most obstructions safely.-If no debris appears to be blocking the fan, position the top white portion of the sensor (that has the solar panel) in direct, bright sunlight. The fan should power on immediately without any assistance (such as a nudge). Note: Artificial light, such as flashlights, cannot be used as a substitute for actual sunlight. Also, overcast days may not be sunny enough to power on the fan.To reassemble the sensor, bring the two halves of the sensor back together.Reinstall the four outer screws to join the upper and lower portions of the sensor together.
D**C
As Advertised
Easy setup if you want to connect to Weather Underground. I replaced another brand who's rain bucket lasted a year and after 4 of them it was time to try something else. You do have to calibrate the rain bucket which is a little bit of a pain but works well after that. Nice setup.
Trustpilot
1 month ago
2 weeks ago