


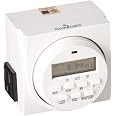
Autopilot Dual Outlet 7-Day Grounded Digital Programmable Timer, 1725W, 15A, 1 Minute On/Off
Details
- ColorWhite
- BrandHydrofarm
- MaterialStainless
- Product Dimensions5.3"D x 4.3"W
- Item Weight7.36 ounces

Description
⏳ Automate Your Life, One Outlet at a Time!
- SAFETY FIRST - UL-listed for peace of mind and reliable performance.
- DUAL POWER CONTROL - Effortlessly manage two devices at once with a single timer.
- MAXIMIZE YOUR TIME - Set up to 8 on/off cycles daily for ultimate convenience.
- POWERFUL PERFORMANCE - Handles up to 15A and 1725W, perfect for high-demand appliances.
- SMART LIVING MADE EASY - Transform your home into a smart haven with programmable automation.
The Autopilot Dual Outlet 7-Day Grounded Digital Programmable Timer allows you to control two devices simultaneously with up to 8 customizable on/off cycles per day. With a robust capacity of 15A and 1725W, this UL-listed timer is designed for safety and efficiency, making it an essential tool for modern living.
Reviews
D**T
Nice 7 day 8-on, 8-off events any day or days timer
Edit July 16, 2013: It stopped working about 3 months ago. The LCD display and button responses all appear normal but the unit does not pass AC current. The LED that indicates the On condition does not shine. I opened it up, saw no irregularities, put it back together. Ultimately I tossed it and bought the GE 15154 Random On/Off 7-Day Digital Timer here on Amazon, which was only $10.18 and has 20 on/off cycles compared to only 8 for this one. My usage is such that the extra cycles are a big bonus. I am so far pleased with the GE, but my experience tells me that longevity is the issue with these timers.- - - -I've only had it an hour but I'm already pleased. I have two Intermatic timers, the DT1 and the DT7, which is similar to this Hydrofarm. I outgrew the DT1, and DT7 fulfilled my needs but the buttons have gotten unresponsive to the point where it's a knock-down-drag-out fight to reprogram it or adjust anything at all, this after having it for maybe 10 years. This Hydrofarm seems to work great. Hopefully, the buttons will remain responsive.You can set up a schedule with up to 8 separate On events and 8 separate Off events. Each single event can be for all days of the week, any one day of the week, Monday through Friday, Saturday and Sunday, all days but Sunday, Monday Wednesday Friday, Tuesday Thursday Saturday, Monday Tuesday Wednesday, Tuesday Friday Saturday. There's a random mode you can toggle to get from 2 up to 32 minutes of "random" variation.You can override the settings. For instance, suppose right at this moment the timer when according to the schedule would be Off (meaning no power is supplied to the device plugged into it) and you decide you want it On. There's a button marked ON/AUTO/OFF. The LCD display as you keep pressing that button goes like this: On, Auto, Off, Auto, On, Auto, Off, Auto, On, etc. Thus, if I want it On right now although the programmed schedule has it normally off at this time, I press the ON/AUTO/OFF button and after seeing On in the display I press it one more time so Auto will appear in the display and it will be On and remain On until one of the scheduled events turns it Off, being the schedule taking control again. With my Intermatic DT7 due to the unresponsiveness of the buttons if I wanted to override the schedule I used to have to unplug my device from the timer and plug it into a regular outlet for the time being (if I wanted it On, or leave it unplugged if I wanted it off) and then remember to plug it back into the timer to get back on schedule. Problem solved with my new Hydromatic.I was concerned when I found out that it has a rechargable battery in it that is not replaceable. The Intermatics each use a single AA alkaline battery, obviously replaceable, to retain settings when you remove the timer from AC power. I contacted Hydrofarm and asked about the installed battery and they contacted the vendor and replied to me by email that the internal battery is NiMH. A review here states that the battery is soldered in. It might be replaceable, I don't know, I haven't removed the 4 screws and looked inside. However, maybe the installed battery will remain good enough for many years, as long as you don't remove the timer from AC power for too long. It shouldn't need much energy to retain information and run for just a few minutes when unplugged.It comes in a hard plastic bubble pack, but that was a pleasant surprise. I didn't have to use a knife or a scissors to remove it and risk cutting my hands with either a blade or the sharp edge of cut hard plastic. The timer, etc. popped right out with a slight twist. I wish this were more commonly done.It can deliver a lot of power (15 amps) and the price is quite reasonable. I looked all over for 7 day timers and this one won out easily.I scanned and used OCR software on the printed instructions (couldn't find them online), did a bit of editing to make it more clear and saved as a text file. Here is my improved version:- - - -DIGITAL GROUNDED 7-DAY TIMER1. Press the reset button. (Do this if you want to erase all settings)The reset button is the small round white recessed button on the rightside of the timer face. Use a pointed object to reach it in order toerase all previous programming.2. Set the clock.HOUR: Press the clock button and simultaneously press the HOUR buttonuntil you arrive at the correct hour. (Be aware of AM and PM hours.)MIN: Again pressing the CLOCK button, simultaneously press the MINbutton until you arrive at the correct minute.WEEK: Press the clock button and simultaneously press the WEEK buttonuntil you arrive at the current day of the week.3. Program your settings.Each event is numbered and has a time to come on and a time to go off.You can set 1, 2, or up to n different events using the PROG (program)button. The PROG display will start at 1 ON. As you keep pressing thebutton, the display will cycle through all the events: 1 ON, 1 OFF; 2ON, 2 OFF; 3 ON, etc.. up to 8 OFF. For each event you must set WEEK,HOUR, and MIN. First select which days of the week this particular eventwill function (WEEK button.) As you press the button, it will cyclethrough all the possibilities which include: MoTuWeThFrSaSu (everyday ofthe week); Mo, Tu, We, Th, Fr, Sa, Su (each individual day of the week);MoTuWeThFr (only week days); SaSu (only weekends); MoTuWeThFrSa; MoWeFr;TuThSa; MoTuWe; or ThFrSa. After selecting the desired day(s) your eventwill function, select the timing for the event to come on or go offusing the HOUR and MIN buttons. (Be aware of AM and PM hours.)4. Set to automatic.Use the ON/OFF/AUTO button to set to automatic. The button cyclesthrough ON, AUTO, OFF, AUTO, ON, AUTO, OFF, AUTO, ON, etc. as you keeppushing it. If, according to the schedule you have programmed, it issupposed to be off at that time of day (and day of the week), you cycleit through to AUTO after cycling past OFF. If, according to the scheduleyou have programmed, it is supposed to be on at that time of day, youcycle it through to AUTO after cycling past ON. If you are using thetimer for subtle equipment like C02 and you want to test your programmedschedule, you can try plugging in something more obvious like a light ora fan so that you can see the changes more easily.NOTE: Daylight Savings mode -- IF you press HOUR and MIN at the sametime you will get Daylight Savings mode which will delay your settingsby one hour automatically. This will be shown as a clock symbol over theblack dot in the right lower corner of the display. Press HOUR and MINsimultaneously to remove the Daylight Savings mode. Random mode -- If youpress WEEK and MIN simultaneously, the display will show a O above theclock symbol which will flash when functioning. This is random mode. Theon and off timing will be delayed by 2 up to 32 minutes randomly. Thissetting is probably not useful for gardening purposes. One use of thissetting is for lights, to fool would-be burglars when you are not home.Again press WEEK and MIN simultaneously to remove this mode.Edit 1: I've had it 60 days now and I'm using almost all of the on/off events and it has been working perfectly.Edit 2: I can't tell you how aggravating it was trying to reprogram or adjust the time on the Intermatic D7 (mentioned near the beginning of this review) once the buttons became almost totally unresponsive. Lest this Hydrofarm timer suffer the same fate, I've decided to not orient it in such a way that dust can settle into the buttons' crevices (easily managed, because the timer is plugged into a short extension cord), and in addition I have taped a piece of Saran Wrap to the front face. I can see through that and press buttons fine. These tactics will hopefully prevent most dust and dirt from reaching and penetrating the face of the device and will significantly extend its useful life.Edit 3: One nice feature that's lacking is a backlight for the LCD such as I have with my universal remote control. That remote's LCD lights up for a few seconds when a specific button is pushed, allowing me to read the LCD even in the dark. When I want the timer set on Auto (necessary for the programmed settings to kick in at the appointed times, i.e. on or off), I need to reach for a flashlight and illuminate the screen to make sure that Auto is displayed. It's a minor inconvenience. The timer continues to work well after nearly two years of use.
K**N
Great timer ...
Great timer to control your growing environment in your tent ... would recommend ... easy to use ... Timer functions say it can be set for 8 settings a day not so ... just remember you can only set one day at a time on the on and off functions ... say you want the lights to come on then off ... this function can only be set for one day at a time. Have and would buy from seller again.
B**Y
My quest for good sleep
As a man in my early 70s, I struggle to get good quality sleep. One of the negative influences to an individual's sleep is that the bedroom can become a dreaded place when you anticipate another bad night of sleep. There are many comments in sleep articles that mention that the bedroom should be a place where you feel comfortable and not stressed out. The path toward this suggests making the room pleasant and attractive to you. Since I enjoy Christmas lights, I wanted to place a string of red ones around the perimeter of my bedroom located in our basement. I chose LED lights rather than incandescent since they last a long time and use less power. I also chose red lights due to the effect blue light has on your biological clock. I wanted these lights to turn on at a certain time and then turn off after I'm in bed so I chose a timer in this case rather than a switch. Pretty simple, actually. I chose this unit because it is a small plugin digital unit and has a built-in battery to retain time and event memory in case of power outages. The precise timing of the light was to help lock in my biological clock. Since I'm semi-retired, I don't have to wake at any particular time, so that annoying alarm clock is GONE!! The lights are enough to wake me much more pleasantly. (if I'm not already awake) Check my other reviews and may God help you in your quest for good sleep.
D**U
Great dual digital timer with a need for better instructions.
I bought the dual digital timer for my two cat feeders. Since my cat feeders have their own portion size controller, I didn't mind not having the seconds control. I chose this for the good reviews and the built in rechargeable battery. I knew buying this product I could face a difficult time programming the timer. Setting up the clock was the easiest part. Setting up the timer was doable after a few passes through the instruction guide. Understanding the On/Auto/Off mode was impossible. I did a search on the internet and found an easier to understand instruction guide for the same product but different model number (Chicago Electric Model 95205). Apparently that set of instructions was 5 pages long versus this skimpy set of instructions. I guess the company wanted to cut down on the cost. I wrote out a simpler version for myself that I would like to share. This is actually an easy timer to setup but the instructions that came with it doesn't do it justice.1. Before using the digital timer, plug it in for 15 minutes to allow for the internal battery to charge. After recharging, press the R button to reset the unit.Setting the Clock2. Set the Hour: Press the CLOCK and HOUR buttons to set the hours (watch out for AM and PM).3. Set the Minutes: Press the CLOCK and the MIN buttons to set the minutes.4. Set the Day of the Week: Press the CLOCK and the WEEK buttons. The display will scroll through each day of the week.Setting the Timer5. To set the Digital Timer to turn ON: Press PROG to begin. The timer will display "1 ON"/ Press HOUR, MIN, and WEEK to set the hour, minute and day of the week you want the Digital Timer to activate.6. To set the Digital Timer to turn OFF: Press PROG again. "1 OFF" will be displayed. Press HOUR, MIN, and WEEK to set the hour, minute and day of the week you want the Digital Timer to turn OFF.7. To undo a setting, or go back to a previous setting: Press R which will cancel the current set time. Pressing R again will bring you back to the previous setting on the Digital Timer.Using the On/Auto/Off Mode8. The LCD readout will indicate if you are in the On, Auto, or Off stage of the program.9. Pressing the "ON/AUTO/OFF" button to the ON setting will set the Timer to turn ON for an appliance. It will not turn OFF the appliance.10. Pressing the "ON/AUTO/OFF" button to the AUTO setting will set the Timer to turn ON and OFF at selected intervals.11. Pressing the "ON/AUTO/OFF" button to the OFF setting will turn the Timer OFF.Options for Setting Day(s) of the Week (Use with Setting the Timer)12. To set the Timer to go on DAILY: Press WEEK once. The display will show Mo-Tu-We-Th-Fr-Sa-Su.13. To set the Timer for one specific day: Press WEEK two times until the desired day of the week shows.14. To set the Timer for Monday through Friday: Press WEEK until the display shows Mo-Tu-We-Th-Fr.15. For Saturday and Sunday only: Press WEEK until Sa-Su shows.16. For Monday through Saturday (Sunday excluded): Press WEEK until Mo-Tu-We-Th-Fr-Sa shows.17. For Monday-Wednesday-Friday only: Press WEEK until Mo-We-Fr show.18. Etc.19. Press R at any point to cancel the current setting. Pressing R again will take you back to the previous option.
Common Questions
Trustpilot
1 month ago
1 day ago
