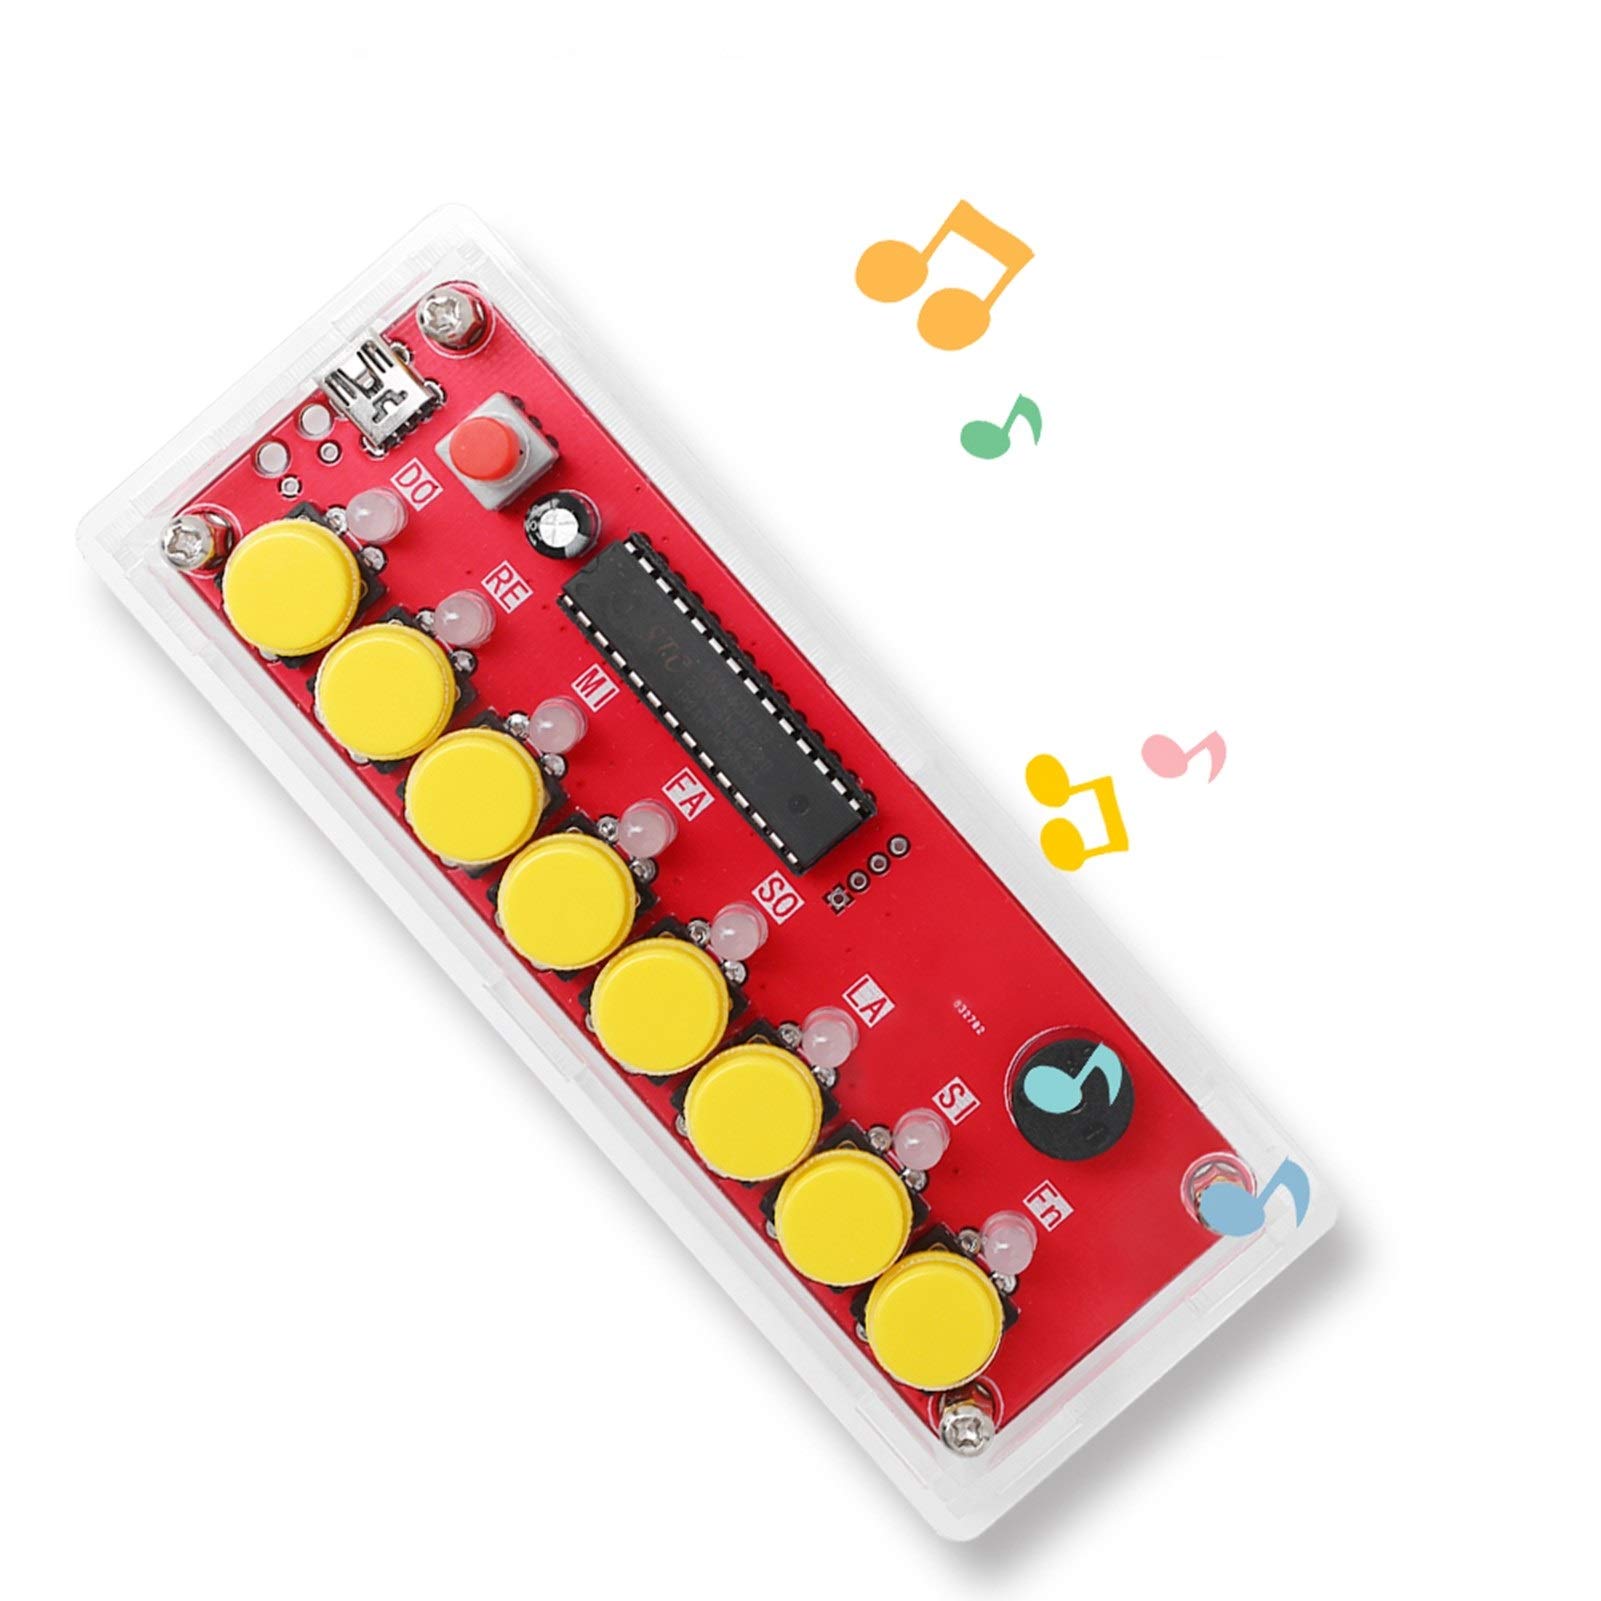
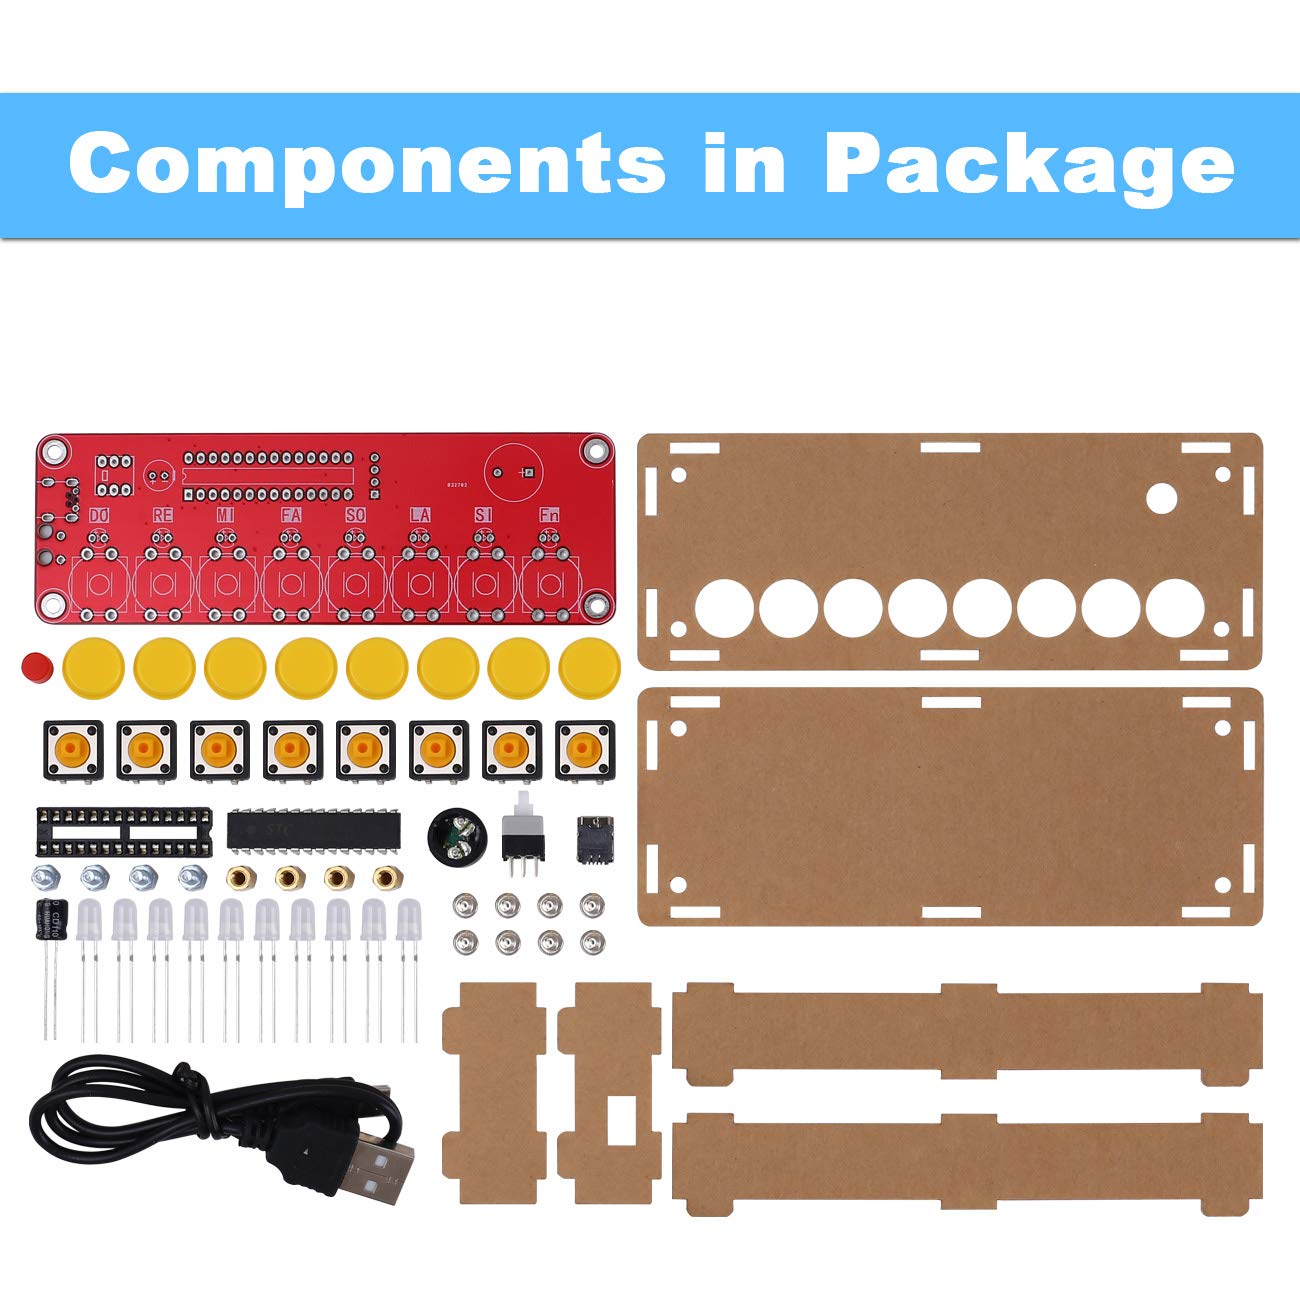
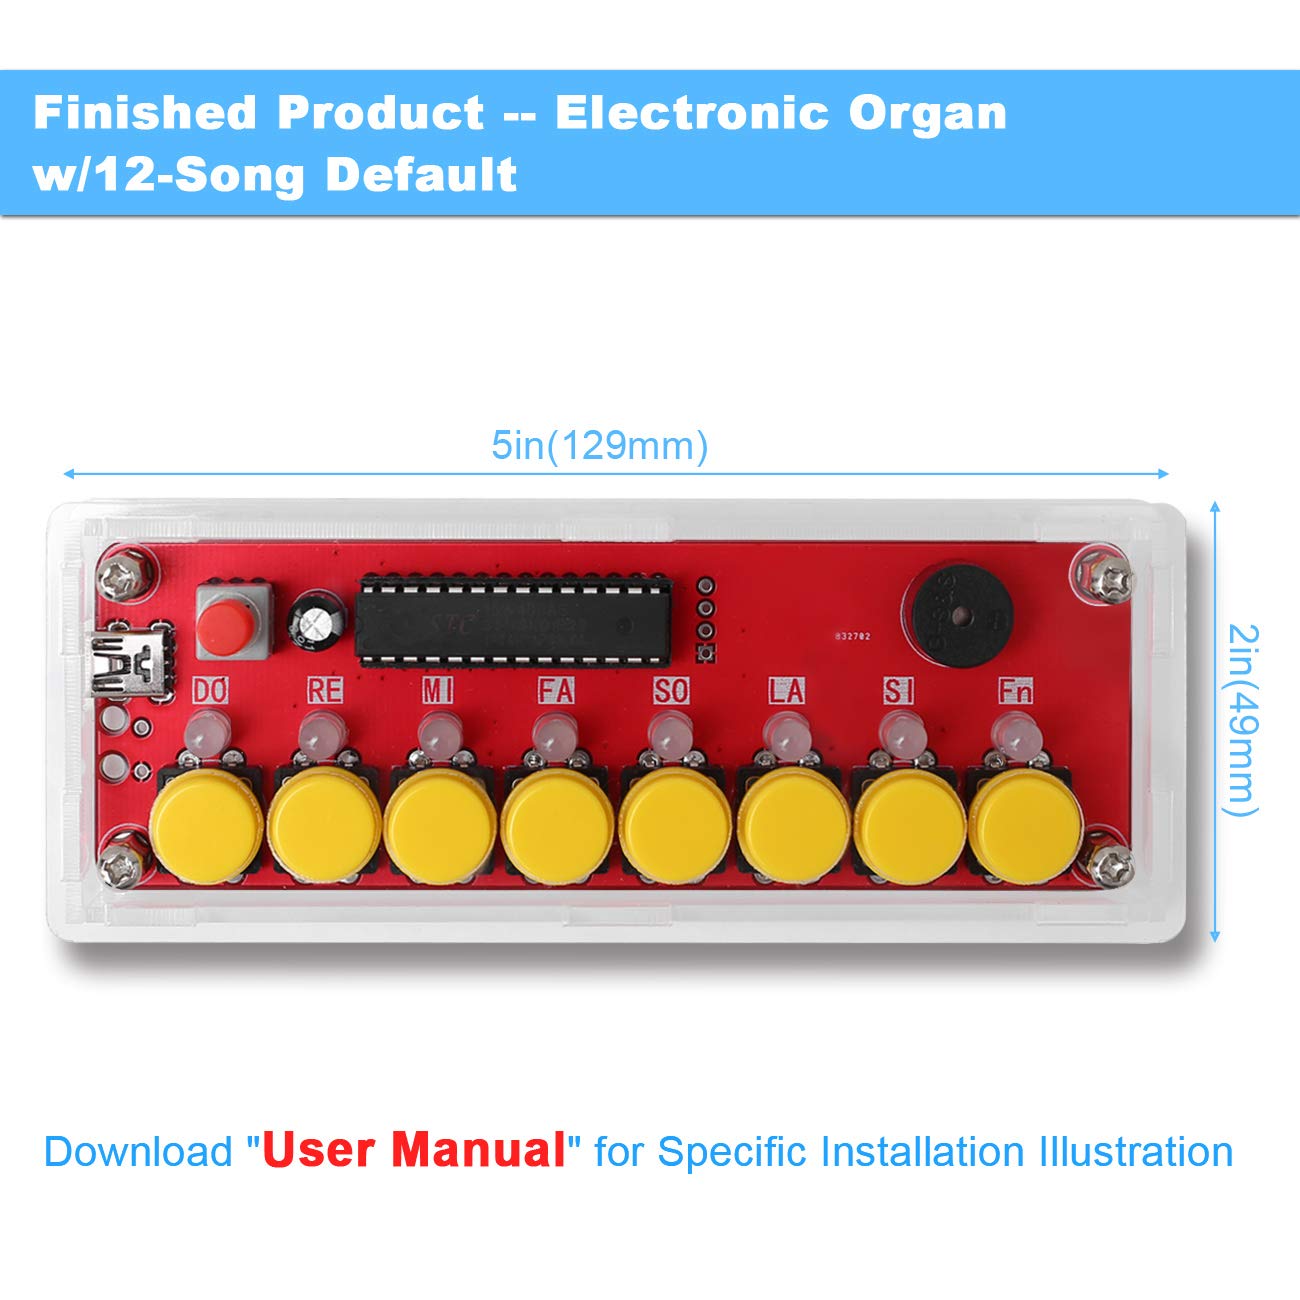
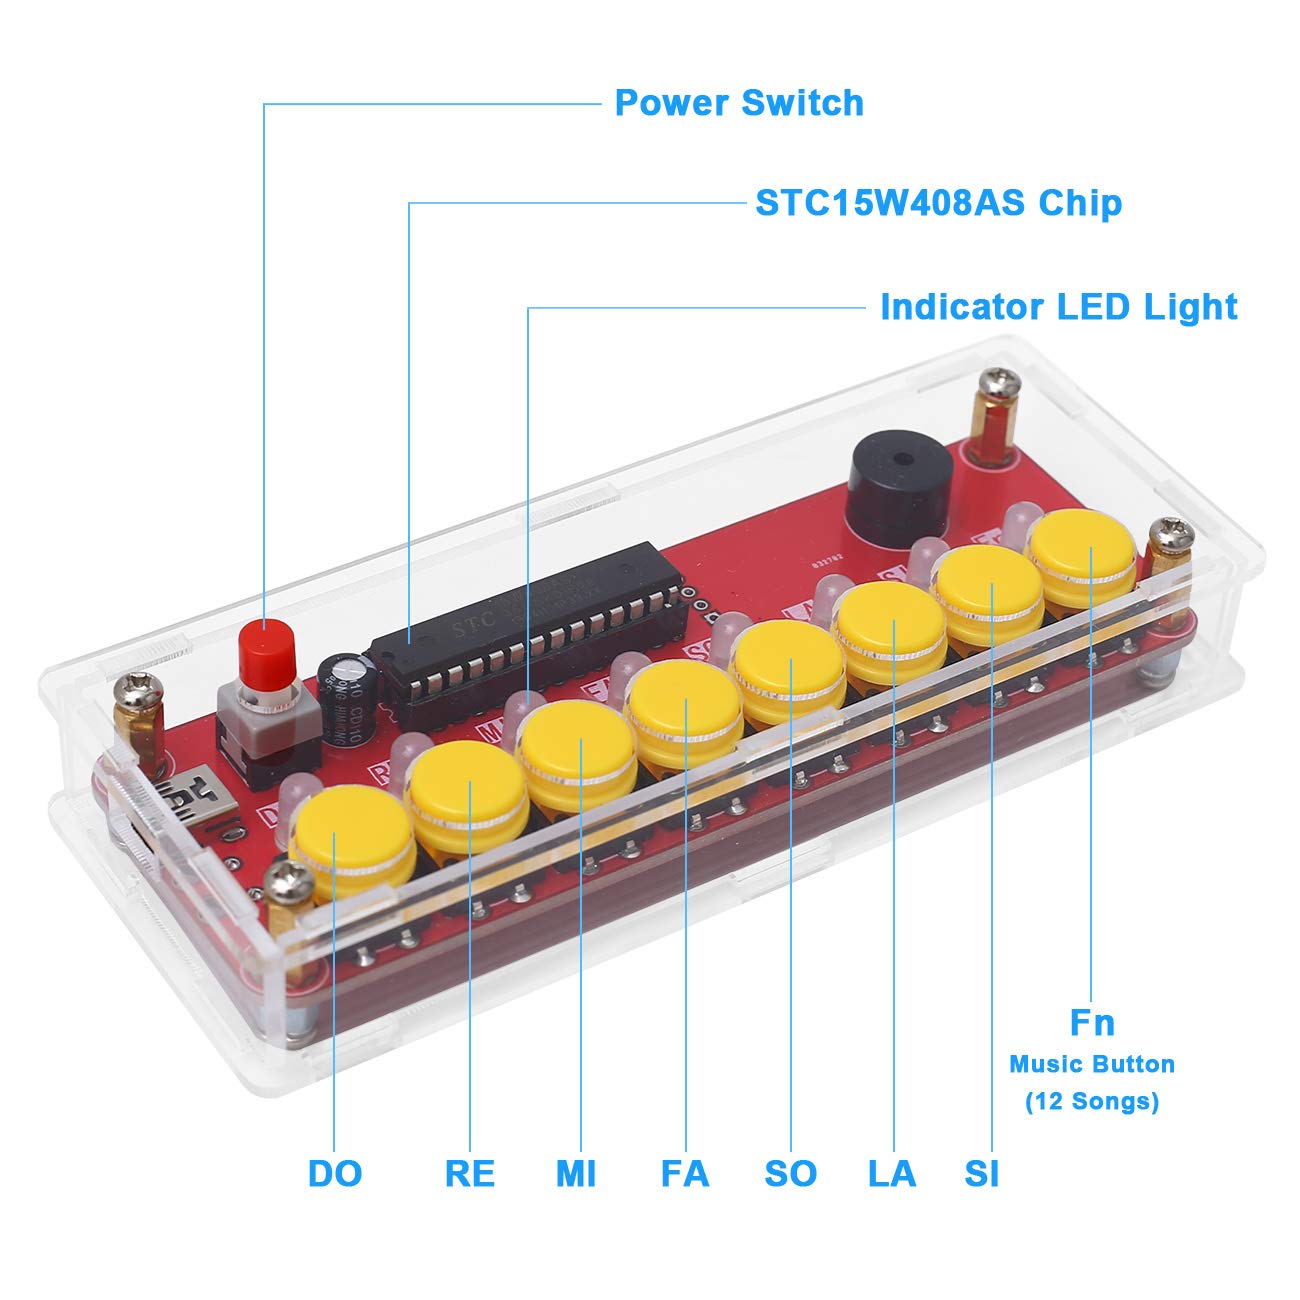


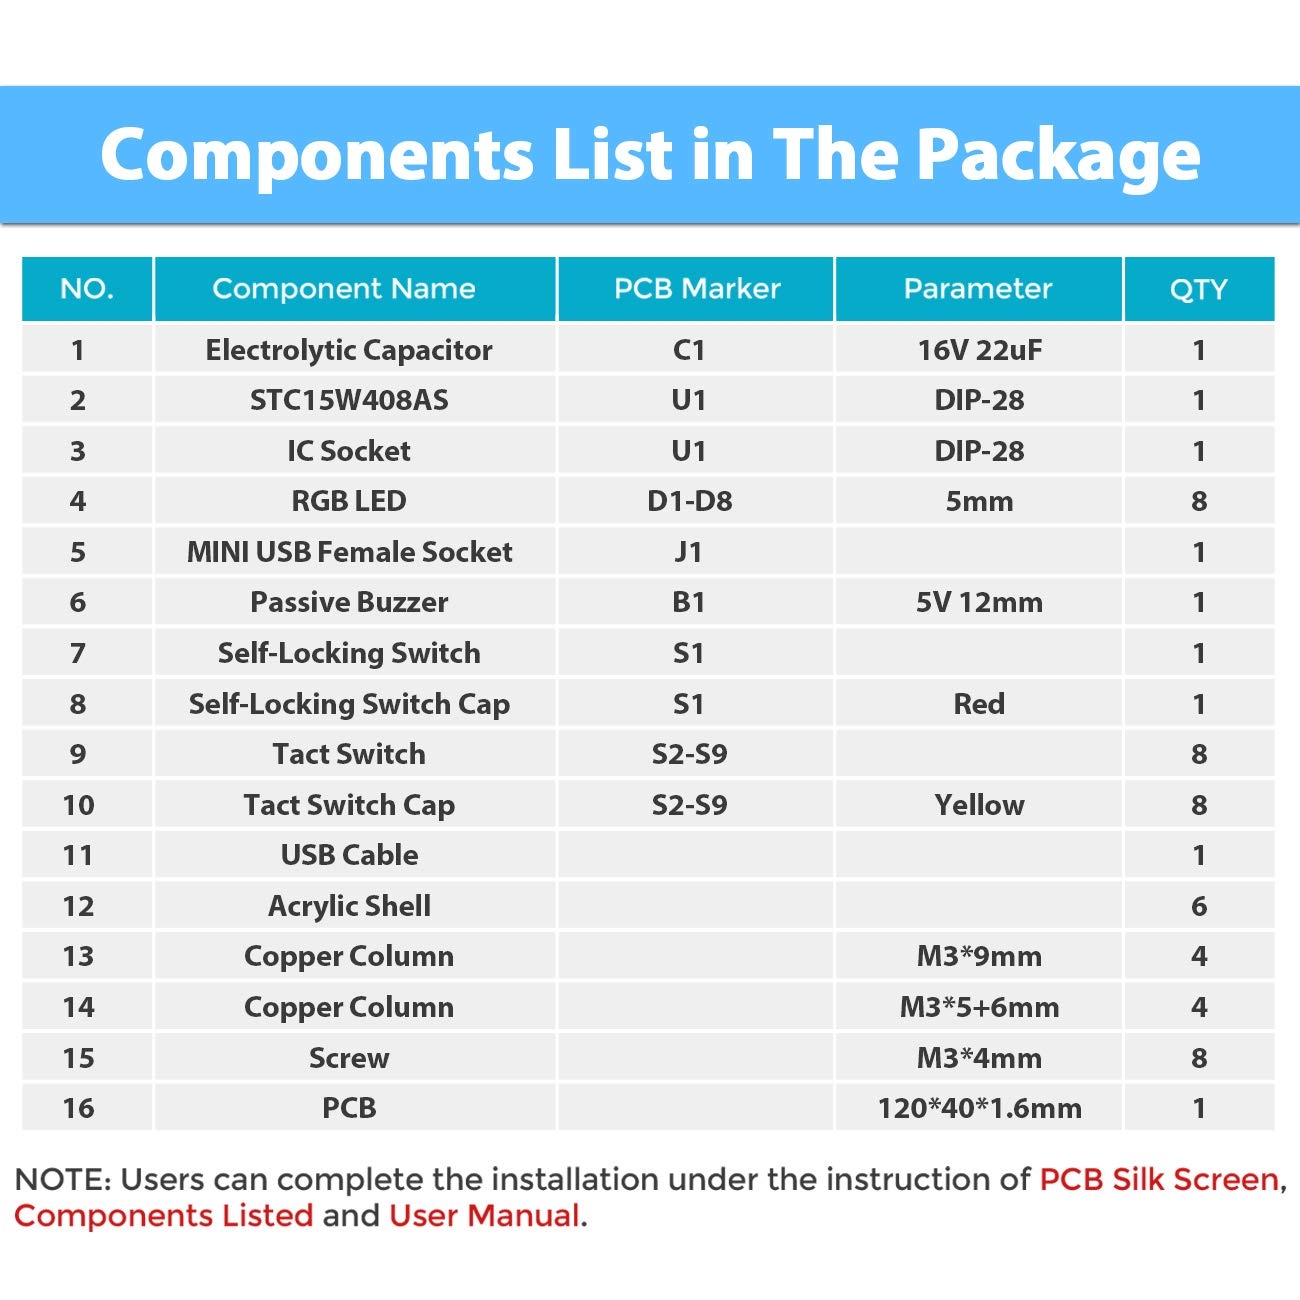


Color:Electronic Organ You Wanna Experience Fantastic Electronics Soldering? You /Your Kids Are Interested in DIY Electronics Projects? Wanna Spark & Encourage Child's Talents & Passions and Keep Electronics Learning Interesting and Fun? Racked Your Brains About Cool Gifts to Friends/Kids? This 12-Song Electronic Piano DIY Kit Born for It. It Makes Learning Not A Dull Thing But A Great Joy. You /Your Child Will Enjoy The Pleasure of DIY Electronics. This DIY Electronics Kit Highly Recommended by Teachers to Learn Electronics & Practice Soldering Skills for DIYers, Electronic Enthusiasts, STEM Students, Beginners, or Anyone Looking For A Switch for Projects. What Will You Get? 1. Challenging-to-Assemble LED Christmas Tree DIY Kit: --The product comes to you is Component Kit needs to be installed to A Cool 12-Song Electronic Piano. It's helpful to learn basic electronics and circuit principles through hands-on practice. In the meanwhile you can enjoy the fun from the DIY projects. --Easy to Follow to Assemble: The 12-Song Electronic Piano kit components' marker name clearly mapped and labelled on PCB layout makes it easy to assemble. Installation Method: Please download "User Manual" on the Product Page Named "Technical Specification" Section (Due To Character Limit) For specific installation steps and illustration. 2. Strong Technical Support: In addition to providing quality products, fast logistics and perfect after-sale service, we can assist you in the installation. Product Defective? Contact Us for Reshipment or Refund. Finished Product Failed Achieving The Effect? Contact Us for Professional Help. Any Issues? Don't Rush to Throw Out A Negative Feedback Out of Anger And Impulse, Contact Us to Solve Your Problem. Communication Makes Problems Gone!
E**R
Great for beginners or anybody just looking to burn some time (get it?!)
Update: still loving it. I modified the digit boards so they don't look like 88:88:88 all the time. Maybe it's my eyes but I think they suck unless they're tinted to at least 15%±2.5% transmissivity, see picture. I also welded up a 3S 18650 li-ion cell pack to power it. The cell pack also works as a stand. I finished the board backing with a Dremel and silicone based conformal coating. Probably too much effort for this tiny clock kit, but I generally obtain very fine results in my craft(EE) by habit. These are really great kits for those looking to pass time. Oh, and the multi function aspect, well, I finally figured out how it works.Press left most button to change the mode, center and right to change parameters. In order, you have:+24 hr time+set time+alarm time (all dashes for off, can't set to 00:00, set hour marker to 00 to get the dashes/alarm off)+countdown timer (middle button to change digit selection, right button to change value, format is HH:MM:SS. Initialize by pressing middle button 7th time which is after last digit. It will start. This was the hardest to figure out.)+stopwatch (middle button start/pause, right button reset to 0)+counter (middle button add 1, right button reset).Kind of confusing when you first put it together, real simple after that.This is my third or fourth clock kit that I ordered from this company. Every single one that I've got has been complete has very clear instructions, and is a joy to build every time. I would say that this is acceptable for anyone above the age of 12 or 13, any younger and the child will need guidance, but otherwise this is a very simple kit and just about anyone can put this together if they have very basic skills with a soldering iron and virtually no knowledge on electricity or Electronics.All in all, this was a good purchase. I enjoy most of the products I get from this company even though I am a experience electrical engineer, sometimes it's fun to get some pre-made kits, it's also much less time consuming too.
P**N
Built by my 11 year old boy
I used this as a soldering lesson for my oldest 11yo boy. I showed him what to do with only one resistor. Oh, and I soldered in the CPU socket mostly because I wanted to. The rest he did all by himself, checking with me to make sure he was putting the components into the right place. He was worried he would ruin it, but it's affordable enough that I could honestly tell him that if he wrecked it, I'd buy him a replacement and give him a second chance. With that reassurance he had the confidence to proceed. Worked first try!Bonus! I didn't realize it when we bought this, but not only is it a cool LED clock that tells time in seconds, but it also works as a stopwatch, and a countdown timer like the stereotypical cinema explosive contraption. Pretty fun for a kid, and kind of neat for Dad, too.p.s. you'll need a 9V battery cap or a 9V DC power supply to make this go.
F**N
Nice little soldering and construction practice kit for intermediate or beginning builders.
I am fairly experienced with electronics, having built a lot of much more complex kits in the past than this, including everything from remote control switches to TV's and computers back when Heathkits were a thing. (I miss them!)This kit is complete, and the circuit board is of good quality. Silkscreening is easy to read, and the components were all included as specified in the instructions.I'd say due to the size of the board (small) and the density of the components you'll be installing on the board, this might be a stretch to call it a "beginner's kit". Soldering isn't difficult, but to make sure you don't short between closely-spaced pads and traces on the boards requires a little skill and care. If you have the ability to do those things, and can follow the instructions, you should be fine. But keep in mind the skill level of whoever you're buying it for, and act accordingly.The purchase included 2 full kits for this device. Everything is packaged in small ziplock-style plastic bags. The instructions were not included with my kits, but I believe they're supposed to be. It's not an issue since you can download a .PDF file as shown in the "Product Information" section of the listing for the kit. The instructions include color photographs and text descriptions of each step.Now, I must admit that when I put the first kit together, it did not operate correctly. I spent quite a bit of time trying to figure out what I had done wrong, and whether or not one or more of the supplied components was bad. I thought I'd tried everything, but I got nowhere. So I ended up building the second kit to see if I'd damaged something. It didn't work either. Exactly the same problem.So, a bit frustrated, I gave up and contacted the manufacturer, not really expecting much in the way of response. Somewhat surprisingly, they responded immediately, and in several back-and-forth messages, including analyzing photographs I sent them of my work, they were able to finally determine that I had indeed done something wrong when I wired the board to test it.All the parts were installed correctly, and my soldering was done right. BUT, I had misinterpreted where on the board one was supposed to attach the 5VDC power. I'd hooked it to a 5VDC OUTPUT connection, rather than the proper position on the board. This was not addressed at all in the instructions, and even the labelling on the board was a somewhat ambiguous. There were two places on the board which were marked 5V + and -. What I didn't know was that one was indeed for the input power, and the other was supposed to be a 5VDC output to be controlled by the board. Both said 5V, but neither said input or output.They agreed that the instructions were incomplete, and they have now rewritten them to make this clearer. The new version would prevent one from making the mistake I made, because they address it directly.I made the specified change, and immediately the board worked just as it should.So, the problem was solved by the manufacturer's analysis of my work, and they not only told me how to fix my board, but they thanked me for my feedback, and immediately revised the instructions to keep others from doing the same.With that in mind, I can now say I'd recommend this kit for practice for, let's say not raw beginners, but intermediate builders/solderers. It would be good for someone who'd done a very simple kit before to up their skills a bit and to get a little more practice with a project they might actually be able to put to use later.
Trustpilot
1 month ago
1 day ago
